Sistem optic Nikon K-CMM
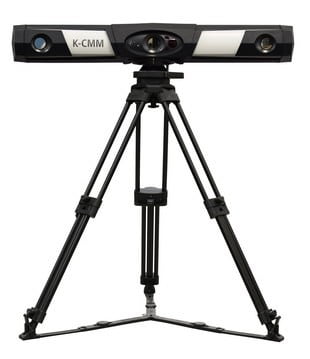
K-CMM is an accurate portable measurement system suitable for checking design, production and dimensional quality in industrial environments.
The system offers high measurement accuracy in a volume up to 35 m³ through the use of camera technology triangulating the positions of infrared LEDs positioned on a Multi-Sided Probe or optional K-Scan MMDx scanner.
K-CMM is a truly portable system enabling users to measure on-site. Systems are available with two measurement volumes and accuracies to suit user’s needs. Through dynamic scaling of the camera measurement volume, reliable measurements can be taken within a range of 10 °C to 35 °C.
Benefits
- Flexibility and mobility enables fast on-site inspection and interventions
- Reduces production stops and scrap
- Multi-sensor ready: Tactile probing and non-contact laser scanning
- System stability guarantees high accuracy measurements because no moving parts are used
- Full measurement freedom due to walk-around Multi-Sided Probe
- Dynamic referencing enabling measurement of unstable parts
- Easy one man set-up and use
Applications
- Inspection of parts or complete products in design, engineering, production and daily operation
- Fixtures and jigs
- Body-in-White / Sheet metal
- Other applications include:
- Inspection of parts or complete products in design, engineering, production and daily operation
- Fixtures and jigs
- Body-in-White / Sheet metal
Ready for probing and scanning
Multi-sided probe

| Standard stylus | 4 mm diameter ruby tip |
|---|---|
| Probe changing | Repeatable using Renishaw autojoint |
| Number of LEDs | 25 |
| Acceptance angle | Unlimited pitch, yaw and roll |
| Dimensions | 185 mm x 185 mm x 180 mm (with standard stylus) |
| Weight | 326 g (with standard stylus) |
K-Scan MMDx (optional)
 The K-Scan MMDx is a walk-around scanning solution combining the digital ModelMaker MMDx laser scanner with the portable K-series optical CMM. K-Scan is ideally suited for on-site 3D digitizing tasks requiring minimum setup and fast results. Operating the scanner with a laser stripe width up to 200mm is easy and efficient. The 6m working range of the optical CMM is more than sufficient to take measurements in and around a full vehicle. The dense point clouds that are acquired can be graphically analyzed in Focus software, or in 3rd party packages.
Mounting

| Maximum load | 55 kg |
|---|---|
| Height adjustment | 500 mm to 1600 mm |
| Angular adjustment | 360° pan, ±10° tilt |
| Footprint adjustment (diameter) | 840 mm to 1220 mm |
| Weight | 7 kg |
Dynamic referencing (optional)
The initial alignment of a work piece is monitored by three LEDs mounted directly on the part. The Optical Tracker-to-part position and orientation is constantly tracked and updated, avoiding the need for leap-frogging to extend the measurement volume or measure from a different direction. This technology make it possible to measure parts that move or are subject to vibration with the same level of accuracy as if they were rigidly fixtured.
K-CMM multi-measurement (optional)
Two or more K-CMM Optical Trackers can be linked together to form a unified measurement volume with a single co-ordinate system. Whether the objective is to enlarge the measurement zone for very large parts or assemblies, or to provide unobscured views of complex parts from all sides, K-CMM Multi’s flexible configuration means the solution can be tailored to many different measurement applications.
Dynamic measurements (DMM) (optional)
Using the K-CMM with the DMM (Dynamic Measurement Machine) option allows tracking of rapid and complicated trajectories of multiple objects with outstanding accuracy. DMM employs the K-CMM Optical Tracker to track LED targets defining key points of interest. This ability to track 3D and 6DOF measurements changes with respect to time ensures the K-CMM with DMM option can provide a powerful and comprehensive toolset for advanced motion analysis and dynamic measurement.
K-CMM DMM specifications
| Target resolution (at 2.5 m) | Up to 2 µm |
|---|---|
| Targets (3D) | Up to 511 |
| Rigid Bodies (6DOF) | Up to 170 |
| Sampling Speed (targets/s) | Up to 4500 Hz |
| Latency | Up to 5 ms |
| Simultaneously track and record | 72 targets 24 rigid bodies |
Example: Effective frame rates vs. # targets or rigid bodies
| # Targets | # Rigid Bodies | Frame Rate (Hz) | Sampling Speed |
|---|---|---|---|
| 1 | – | 750 | 750 |
| 6 | 2 | 575 | 3450 |
| 12 | 4 | 325 | 3900 |
| 18 | 6 | 230 | 4140 |
| 24 | 8 | 175 | 4200 |
| 30 | 10 | 140 | 4200 |
| 48 | 16 | 90 | 4320 |
| 90 | 30 | 50 | 4500 |
| K6000 | K7500 | |||
|---|---|---|---|---|
| Measurement volume | Depth of Field | 4.5 m | 6.0 m | |
| Field of View | Up to 3.7 m x 2.7 m | |||
| Volume | 20 m3 | 35 m3 | ||
| Measurement performance | Volumetric accuracy1 | 95 µm + 25 µm/m | 110 µm + 25 µm/m | |
| Single point accuracy2 | Up to 20 µm RMS | |||
| Single point repeatability3 | Up to 20 µm RMS | |||
| Physical characteristics | Dimensions | 1157 mm x 230 mm x 175 mm | ||
| Weight | 24 kg | |||
| Temperature | Operating: 10 °C to 35 °C | (Storage: -10 °C to 50 °C) | ||
| Humidity | Operating: 30% to 70% | (Storage: 10% to 90%, non-condensing) | ||
| Atmospheric pressure | Operating: 70 kPa to 106 kPa | (Storage: 50 kPa to 106 kPa) | ||
| Warm up time | 30 to 60 minutes | |||
| Power | 100/240 VAC, 50/60 Hz, 1.0 A | |||
| Volume indicator laser | Class 2M (635 nm | |||
| Software compatibility | Nikon Metrology CMM-Manager 3rd party software including PolyWorks®, Geomagic® & Metrolog |
|||
1 Volumetric accuracy is certified in accordance with procedures derived from the general guidelines of ISO 10360-2:2013 for size measurements. Certification consists of performing comparisons of measured values to traceable length artefacts in various different locations and/or orientations in the field of view of the Optical Tracker using the MSP with standard probe stylus. The indicated specification represents a 95% confidence interval.
2 Single point accuracy is calculated by measuring the MSP with standard probe stylus in a static position for one second. The RMS error of the collected points is reported.
3 Single point repeatability is calculated by placing the standard probe stylus with MSP in a conical socket and measurements taken from various angles. The RMS error of the collected points is reported.
Weights and dimensions are approximate.

