Cerere oferta

    Tastează codul: captcha

    https://topmetrology.ro/wp-content/uploads/2021/02/xt-h-series-en.pdf

      Descarcă catalogul TopMetrology

      Tastează codul din dreapta in câmpul de jos: captcha

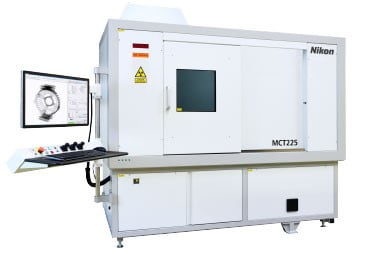
      Industrial Computed Tomography Nikon MCT225 absolute accuracy for inside geometry

      MCT225 offering absolute accuracy for inside geometry

      This new ‘absolute-accuracy’ Metrology-CT (MCT) system guarantees that all internal and external geometry is measured efficiently. A proprietary liquid cooled micro-focus reflection source and air-cooled cabinet provide long-term stability and enable the MCT225 to achieve an impressive accuracy specification. It offers superior measuring accuracy and small feature detection to inspect precision plastic parts, small castings and complex parts and assemblies.

      Benefits
      • 50 years’ experience of Coordinate Measuring Machine (CMM) metrology blended with 25 years’ experience of X-ray Computed Tomography (CT)
      • Absolute accuracy 9 + L/50 μm in accordance with the VDI/VDE 2630
      • Proprietary micro-focus source developed for metrology CT purposes
      • High-precision mechatronics increase sample manipulation accuracy
      • Straightforward manual use and automation process flow execution
      • Powerful visualization and analysis provide detailed insight
      • Suitable for wide range of sample sizes and material densities


      Benefits & features
      • Temperature controlled enclosure;
      • Nikon Metrology X-ray source;
      • Precision manipulator;
      • Accuracy 9+L/50 μm;
      • High resolution
      • Large capacity
      • Protective enclosure
      • Low cost of ownership


      Metrology CT: Non-destructive 3D inspection of internal/external geometry

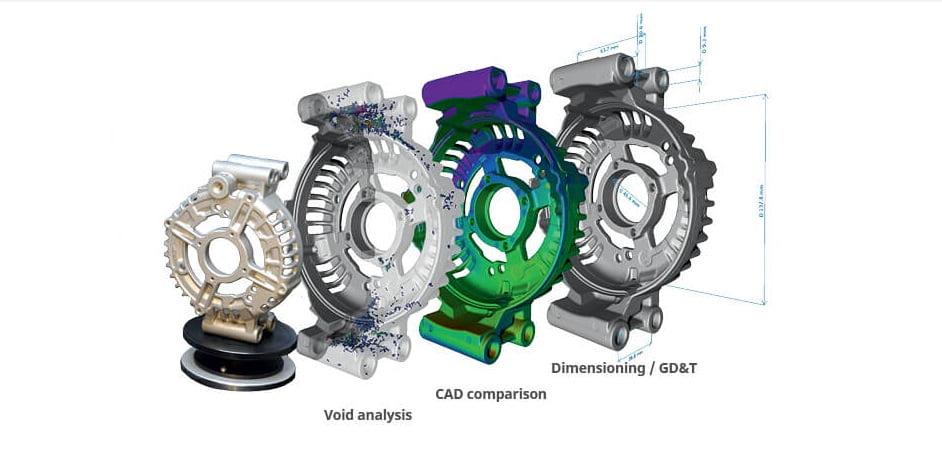
      Metrology CT is the fusion of metrology and X-ray Computed Tomography (CT). X-ray has long been used for industrial applications. With X-ray CT a number of 2D X-ray images are taken at different angles around the sample. All of the external and internal geometry is captured as the X-rays pass through the sample. CT software constructs a 3D model of the sample using these 2D images. Dimensional characteristics such as size, position and form can be measured directly using the model as well as full part-to-CAD comparison, section reporting and GD&T analysis.


      Absolute accuracy of 9μm + L/50 and 2μm feature detectability

      The MCT225 offers absolute accuracy of 9μm + L/50, and 2μm feature detectability. Absolute Accuracy guarantees measurement accuracy without time consuming comparative scans or reference measurements.

      A key component of the MCT225 system is the in-house developed Nikon Metrology 225 kV micro-focus X-ray source. It produces incredibly sharp images with low noise levels, enabling magnification levels up to 150x with 2 µm feature detection.


      High-precision mechatronics increase sample manipulation accuracy

      The MCT225 is equipped with a fully programmable 5-axis precision and large capacity sample manipulator. The manipulator has been optimized through Finite Element Analysis (FEA). The design of the manipulator benefited from 50 years of CMM development expertise, to ensure highly accurate sample movement.

      High precision linear guideways and axis travel error correction offer accurate and repeatable motion within the temperature controlled enclosure. High resolution optical encoders also fit this strategy for maximum precision.

      Large capacity manipulator for samples up to 5 kg.

      Straightforward manual use and automated process flow

      The unique CT Wizard guides the operator every step of the way from sample loading to creating the final inspection report. Settings are automatically optimized for accuracy and image quality without compromising on productivity. Accelerated reconstruction of the sample volume, using optimized graphics cards, reduces the total process time from hours to minutes.

      Macros allow for automated workflows that execute repeated CT data capture.

      Powerful visualization and analysis provide detailed insight

      Reporting and analysis features include:

      • Part-to-CAD comparison with color mapping
      • Surface measurement using surface and voxel data
      • Geometric feature inspection
      • Geometric Dimensioning and Tolerancing (GD&T)
      • 3D visualization of the sample volume

      The same dataset can easily be used for measurement and defect analysis (NDT).

      Flexible efficiency for a wide variety of applications

      MCT255 is an invaluable asset for manufacturers seeking to benefit from reduced leads times and inspection cycles. The powerful X-ray source and large capacity manipulator combine with high magnification and small feature detection to create a solution suited to a wide variety of applications.

      The high-precision microfocus 225 kV and 225 kW source penetrates different materials. The thickness of the samples the can be fully penetrated by the X-ray beams depends on the material density.

      Open tube technology reduces Cost of Ownership

      The open-tube technology of the new source fitted in the MCT225 reduces the cost of ownership. The serviceable open-tube source allows for quick and straightforward replacement of the filament, saving time and money.

      Download the brochure

      Description

      MCT225 offering absolute accuracy for inside geometry

      This new ‘absolute-accuracy’ Metrology-CT (MCT) system guarantees that all internal and external geometry is measured efficiently. A proprietary liquid cooled micro-focus reflection source and air-cooled cabinet provide long-term stability and enable the MCT225 to achieve an impressive accuracy specification. It offers superior measuring accuracy and small feature detection to inspect precision plastic parts, small castings and complex parts and assemblies.

      Benefits
      • 50 years’ experience of Coordinate Measuring Machine (CMM) metrology blended with 25 years’ experience of X-ray Computed Tomography (CT)
      • Absolute accuracy 9 + L/50 μm in accordance with the VDI/VDE 2630
      • Proprietary micro-focus source developed for metrology CT purposes
      • High-precision mechatronics increase sample manipulation accuracy
      • Straightforward manual use and automation process flow execution
      • Powerful visualization and analysis provide detailed insight
      • Suitable for wide range of sample sizes and material densities


      Benefits & features
      • Temperature controlled enclosure;
      • Nikon Metrology X-ray source;
      • Precision manipulator;
      • Accuracy 9+L/50 μm;
      • High resolution
      • Large capacity
      • Protective enclosure
      • Low cost of ownership


      Metrology CT: Non-destructive 3D inspection of internal/external geometry

      Metrology CT is the fusion of metrology and X-ray Computed Tomography (CT). X-ray has long been used for industrial applications. With X-ray CT a number of 2D X-ray images are taken at different angles around the sample. All of the external and internal geometry is captured as the X-rays pass through the sample. CT software constructs a 3D model of the sample using these 2D images. Dimensional characteristics such as size, position and form can be measured directly using the model as well as full part-to-CAD comparison, section reporting and GD&T analysis.


      Absolute accuracy of 9μm + L/50 and 2μm feature detectability

      The MCT225 offers absolute accuracy of 9μm + L/50, and 2μm feature detectability. Absolute Accuracy guarantees measurement accuracy without time consuming comparative scans or reference measurements.

      A key component of the MCT225 system is the in-house developed Nikon Metrology 225 kV micro-focus X-ray source. It produces incredibly sharp images with low noise levels, enabling magnification levels up to 150x with 2 µm feature detection.


      High-precision mechatronics increase sample manipulation accuracy

      The MCT225 is equipped with a fully programmable 5-axis precision and large capacity sample manipulator. The manipulator has been optimized through Finite Element Analysis (FEA). The design of the manipulator benefited from 50 years of CMM development expertise, to ensure highly accurate sample movement.

      High precision linear guideways and axis travel error correction offer accurate and repeatable motion within the temperature controlled enclosure. High resolution optical encoders also fit this strategy for maximum precision.

      Large capacity manipulator for samples up to 5 kg.

      Straightforward manual use and automated process flow

      The unique CT Wizard guides the operator every step of the way from sample loading to creating the final inspection report. Settings are automatically optimized for accuracy and image quality without compromising on productivity. Accelerated reconstruction of the sample volume, using optimized graphics cards, reduces the total process time from hours to minutes.

      Macros allow for automated workflows that execute repeated CT data capture.

      Powerful visualization and analysis provide detailed insight

      Reporting and analysis features include:

      • Part-to-CAD comparison with color mapping
      • Surface measurement using surface and voxel data
      • Geometric feature inspection
      • Geometric Dimensioning and Tolerancing (GD&T)
      • 3D visualization of the sample volume

      The same dataset can easily be used for measurement and defect analysis (NDT).

      Flexible efficiency for a wide variety of applications

      MCT255 is an invaluable asset for manufacturers seeking to benefit from reduced leads times and inspection cycles. The powerful X-ray source and large capacity manipulator combine with high magnification and small feature detection to create a solution suited to a wide variety of applications.

      The high-precision microfocus 225 kV and 225 kW source penetrates different materials. The thickness of the samples the can be fully penetrated by the X-ray beams depends on the material density.

      Open tube technology reduces Cost of Ownership

      The open-tube technology of the new source fitted in the MCT225 reduces the cost of ownership. The serviceable open-tube source allows for quick and straightforward replacement of the filament, saving time and money.

      View more See less

      Do you have more questions?

      You can request an offer

      Industrial Computed Tomography Nikon MCT225 absolute accuracy for inside geometry

      Request offer

      Funding

      Financing solutions for the purchase of new equipment, through BCR Leasing or Grenke.

      See Financing Methods

      See Product Catalog

      You can find all our products that you can always rely on!

      Open the Catalog